Monday, May 31, 2010

Turquoise headbands available

So, I went to the fabric store to buy fabric for SOMETHING ELSE...and this turquoise one was hollering at me. It really did. I past it like three times, and since it's sort of not 'the norm' for what I would buy, I kept walking right on by. But then I couldn't resist. SO, I made several headbands with it...mostly looking like this one.
and they are now available on etsy. (click on "etsy" to buy one!)

Saturday, May 29, 2010

Guest Blogging and Giveaway Alert!

Hey guys! I just wanted to let you know that on Tuesday, June 1st, I'll be guest blogging for my first time on a cute new craft blog, Lil' Luna. (click on the name to go there). She has really, really fun ideas on there, and I'm so excited to be a part of what she's got going on! Check it out
Several of my friends have asked me about this amazing little bib...I know, it's not much to look at, but it is fabulous to slip right over your kids clothes and soak up any mess they could possibly make! So, if you are interested in making one, this is the tutorial that I'm sharing on Lil' Luna. AND if you don't feel like making one, you can enter to win the zebra one that I made. Details on the tutorial!
Soooo, on Tuesday, make it a point to head on over there, and enter to win!
Get excited!

Thursday, May 27, 2010

Kids Chalk Table


this is another oldie-post that I thought was note-worthy for any crafters out there.
I took an old kid-size table that my MIL gave me, sanded it down, painted everything but the top turquoise. Then I taped off the top, and painted it with chalkboard paint (which is so fun, by the way). After it dried, I hand-painted on a little frame with the same turquoise paint and now my kids enjoy sitting on pint-size chairs while they get to color on the table...how can that not be fun?

Personalized Beach Towel Project

I did this a while ago, and put it on my family blog. But then I thought, I might as well put it on here, too, and sort of tell you how to do it, because I thought they turned out so cute! They are so easy to do, and I know my sister is going to make them, and call to ask me how to do it over the phone, so I might as well do a pseudo-tutorial on here for anyone else that wants to do them.
So, here is a tutorial on how to make personalized beach towels...
You'll need:
a huge bath towel or beach towel {I got these from Costco, and I LOVE how big they are}
some scrap fabric
Wonder Under...or something similar
and either a printer, or a cricut machine

scissors, pins, sewing machine, thread...you know.

My friend cut these letters out for me using her 12" cricut that I'm jealous of. They are 9.5 inch letters. If you don't have a cricut, just find a font that you like on your computer, make them the size that you'd like...as big as you could fit on a single sheet of paper...and print them out. Then cut them out and you have the same thing that the cricut did.

1.) Iron your wonder under onto the back side of your scrap fabrics. If you use all the same fabric for all of your letters, just iron one huge piece onto the fabric. (leave the paper on)
2.) Take your cut letters, flip them over (so they're backwards) and pin them to your wonder under/back side of your fabric.
3.) Cut out your letters
4.) Peel the paper off of each of your letters and decide where you'd like to place them. I chose to put them on the bottom right corner of their beach towels, but centered would be cute, too.
5.) Iron the letters in place on the towel.
6.) Pin the letters down, just in case. {seriously, you could skip this step, but I wasn't sure how much the wonder under would hold on the terry cloth, so just pin it in a couple places to be safe.)
7.) Stitch around the perimeter of each letter to make sure it nEvER comes off!

All done...you probably didn't need a tutorial for that, but just in case, there you go!
Sorry I don't have pictures.
ps, you could also just do initials, or even just the first letter of their name...one huge letter on the towel. Cute! I'm just lucky that both my kids have teensy names that fit anywhere!

Friday, May 21, 2010

mAde for MVHS Cheer Coaches

{shhh, it's a secret}
but I think they turned out cute!
fight, diablos, fight!

Thursday, May 20, 2010

Felted Wool Roses on Alligator Clippies

Per Amy's request, here's something new available... The felted-wool roses {made from 100% recycled material} on Alligator Clips:

Yum!
i LOVE to do custom orders...let me know what you'd like!

Extra Curricular Projects

Here are a couple of other projects that I've been working on in the past little while:

Sweet Sophie's Baptism headband made from my tutorial here
and Jen's Thirty-Flirty-and Thriving Queen of Felt Birthday Crown from a tutorial found here.

Wednesday, May 19, 2010

Hooded Towel {tutorial}

My friend Dawn taught me how to make these way back when. (talk about teaching a guy how to fish!) I've made so many of them since then for shower gifts, for my kids, teaching my sisters how to make them for their kids...and their friends...So, I thought I'd post a little reminder how-to for anyone to look back and remember how to make these... or to teach anyone else how to make them, too.
{just don't make one if I'm going to the same baby shower as you..deal? :)}

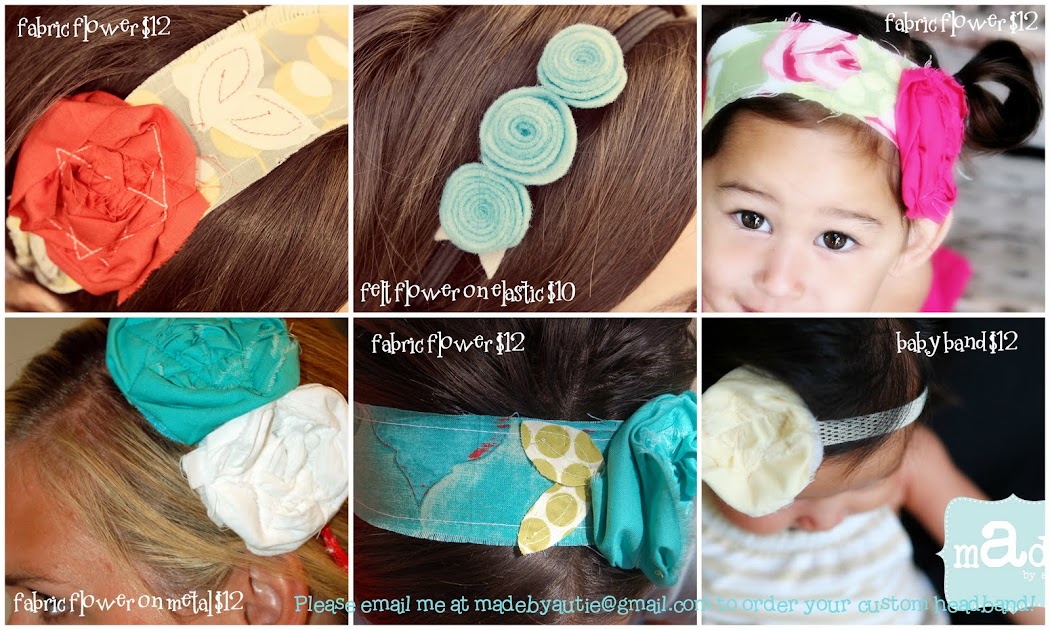
There are so many different ways to doll these up...I especially love Ivy's ruffly one, but here's the basic how to. You can get frisky decorating it later!
{finished products}
to make 2 hooded towels, all you need is:
2 bath towels (I enjoy getting them at TJMaxx, or Marshalls because they're nicer for cheaper)
1 hand towel
ribbon of choice (enough to stretch across the width of the hand towel, and if you want to get really crazy, across the width of the bath towel twice)
scissors, sewing machine, thread...yadayada
{you might as well make 2 if you're going to make one, otherwise you just waste half of a hand towel!}
here we go: (sorry If I'm over-the-top basic, you never know, right?!)


1. Take the hand towel and fold it in half {hamburger way}.
2. very precisely cut it in half. {you could use your rotary, but I just hold it up and chop it in half(ish)
you only need 1 half to make 1 hooded towel
3. decide where you want your ribbon to go. Lots of times, the best place is to cover up the weird pattern they put on towels, but wherever you like it best! {you can also use big ric rac, ruffles, or nothing!
this is where we're putting the ribbon... leave an inch or so on either side just in case something stretches or shrinks while you're sewing (not that I have any experience with that) and trim off the rest.
4. Pin it down! (I hate to pin, but stinkin just do it!)
5. Sew along both sides of the ribbon as close to the edge of each side as you dare. You don't have to tack it down, and you don't have to sew up the width of the ribbon as you'll do that later.
this is what it should look like.
6. Fold it back how you'd like the cuff to look. There is no set measurement for where you should fold it. Some towels have that weird pattern thing in different spots, so just make a generous fold, but don't fold it all the way in half.
7. Pin it how you want it. You will sew up both sides of the towel first, and then in the ditch along the finished edge of the towel so that you don't create a pocket. does that make sense?
you can see where we pinned it: up along each edge, and then across the finished edge.
8. Fold it in half, right sides together, so that the end of the ribbons meet.
9. You have this raw edge where you cut off the other half of the towel...sew the two raw edges together.
10. sew a line across the corner of the raw edge (that you just sewed shut) and the part of the towel that you folded in half to make a triangle. You can see where she started sewing...
...and what the triangle looks like at the end. This just makes it so you don't have a pokey head. you can trim the triangle off if you want, just leave about a 1/4 of an inch.
11. Turn your sucker right-side-out...and this is what you SHOULD have. You're totally almost done!
12. Take one of your bath towels and fold it in half and lay it on the floor. (I have to do it this way because I'm not smart enough to do it any other way...if you have a better brain, you don't have to do it the blonde way!)
13. Place your finished 'hood' next to it, on the fold so that it looks like it should when it's finished...like the picture. (they should each be folded in half, so just line the folds up)
14. Pinch the center of each towels fold together...like this:
15. and then you can pick up the towels and pin the center of each fold together...
...like this.
16. All you have left to do is finish pinning the rest of the hood onto the top of the towel on either side of that center pin, and then sew it straight across, making sure to tack both sides down
17. Remove your pins and you've got yourself the best towel ever!
You can also sew ribbon on the edge of each side of the bath towel, as shown, but you don' t have to. I like how it ties them together.
(thanks Mel, for being my model!)
If I wasn't clear, let me know, writing instructions is sooo hard!

Tuesday, May 11, 2010

Organza Ranuncula {Tutorial}

I'm teaching some girlies from my ward how to make these, so while I was preparing, I thought I'd take a few pics. All you need is a very small amount of organza (polyester blend), the smallest amount that they will let you cut, a few small beads, thread to match your beads and a lighter.
First cut out a bunch of circles from your organza. You don't need to trace anything round to make them, they don't have to be perfect, just cut a general circle shape. You can use as many or as few as you'd like, I used 9 or 10.
To change them from just plain old circles to awesome petals, break out your lighter, or a candle...
slowly singe around the edge of each circle with your lighter. Be Careful! I didn' t know how else to take a picture of this...so, sorry!
you'll end up with a pile of these pretties:
Make sure the rest of your materials are ready to go..thread your needle and tie a double knot.
Begin to layer your petals. You can lay them right on top of each other, it's really cute, too, but I like the randomness of this way. Just make sure that each petal overlaps in the middle. 2 petals:
3 petals:
6 petals:
When it looks how you want it, you will sew your beads on, which also holds the petals in place. Poke your needle up and through the center of the flower.
thread a bead onto the thread
poke your needle back down through the center, very close to where you came up.
do it again and again until the center of the flower is how you like it. (I used 3 on this one and 5 on another one).
When you are done adding beads, thread your needle just through a few of the bottom layers of organza, as shown, to make a loop
and then thread the needle back through the loop to make a knot.
trim off the tails
and dress it up however you like. I added ric rac as the leaves to this one and stuck it on an alligator clip...
These are super easy, you probably didn't need this much information, but you never know! enjoy.