Friday, December 17, 2010

Gift Certificates

are a really good idea for a last minute gift idea...Just saying.
Contact me if you'd like one!
madebyautie@gmail.com

Tuesday, December 14, 2010

Mark Your Calendars!


I just signed up for Sugar Rush, a cupcake extravaganza that will be held at the Piecemakers in Costa Mesa on January 29th from 11-3. There will be a cupcake contest, and lots of vendors, like me! Check out their blog to see some of the vendors that will be there!
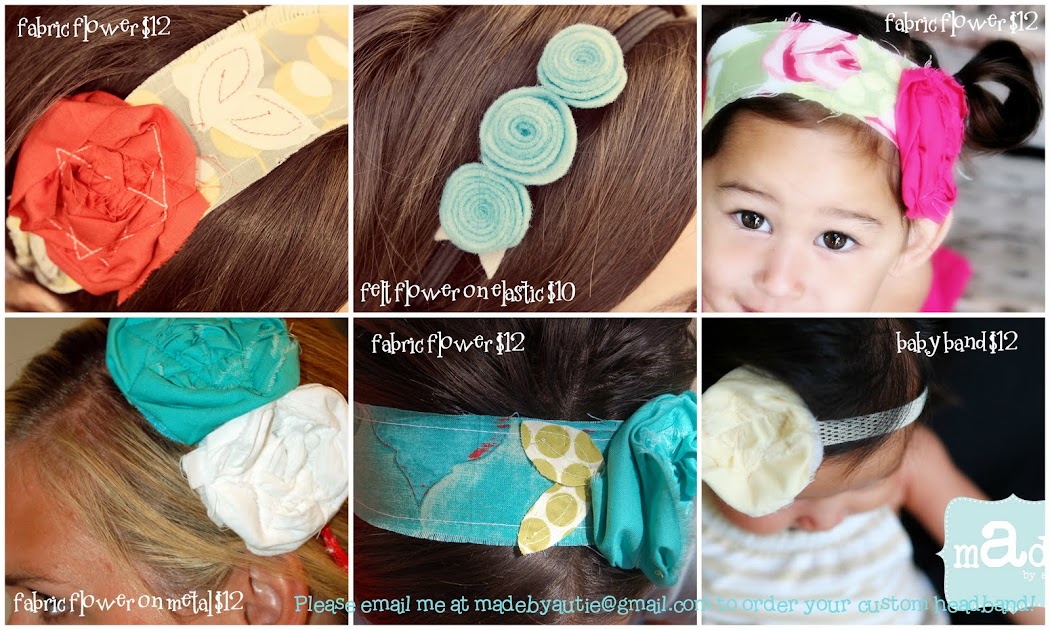
I'll be selling my headbands(all kinds...metal, cloth, recycled, handmade felted wool as well as the classic cotton, pins/broochs, pincushion cupcakes, marshmallow shooters, and maybe some hair-clippies and aprons.
I'd love to see you at the event!

Friday, November 19, 2010

PBKids CopyCat: {Pilgrim Hats}

I can't believe I got these done, hopefully in time to send them off! I got together with my friend Kristi today and constructed a bunch of Pilgrim hats. We had fun! I was in charge of figuring out the boy hats and she was in charge of the girl hats. I think they turned out cute! Here's the finished product of the boys: {ps, I think we're into the crazy-wacko-smile phase}

Pilgrims wrestled, did you know? Here're Max and McKay modeling their new hats:

Ivy's cute girlie pilgrim hat (minus the tie, I'll put those on tonight)

Here's your classic pilgrim couple:


Tuesday, November 16, 2010

Felt Mayflowers

I saw these little felt mayflowers in the PBkids catalogue and wanted to make them! I enjoy copying them! I made the pattern and whipped them out with my friend Brooke in Arizona. I still want to make one more, so anyone that wants to make one is welcome to come over and craft! so fun!

Thanksgiving is next week?!?

Friday, October 22, 2010

Little Guy Tie {on elastic}

I made a tie...
I didn't really think I could do it. But it worked.
My sister in law found a SUPER cute tie at a boutique that was just put onto elastic for around little boys necks. It is so cute, but just a little too short for Max to wear. So, I tried to replicate her idea, and made a few small changes...especially in the length. I have one thing to try to figure out, but then I'll make a tutorial so you all can try!
oh...try not to be scared! the reason I was making a tie at all was because I wanted to make a tie to match Ivy's Halloween skirt, shown here. Scary fabric for a church tie, but dude, it's Halloween!


what do you think?

Sunday, October 17, 2010

mAde for Halloween!

Last year, my MIL bought me a stock of this super cute gray halloween fabric. I didn't know what to do with it...(I know you can't really see it in this picture, but it is seriously awesome.) I didn't want to cut it up...I could make it into pillows...that seemed like a waste. I wanted to do something awesome with it. So, when I figured out that Halloween was on a Sunday this year, I knew what I'd do with it!

I couldn't get Ives to stay still for me to really pose her...so, the pink sparkly tulle underneath isn't stinking out as it's supposed to...dang!
My friend Tara and I used to sell these skirts when we lived in Arizona...they are so fun for us to make, and I really haven't made one for a long time. It brought back lots of fun memories with Tara. and I can't wait for Ivy to wear it to church on Halloween!
How do you like our little witchy-poo? Too bad we can't wear converse and witch hats to church. ;)

Monday, October 11, 2010

Scary Tree

One of my favorite things to do when I'm decorating for Halloween is to get my scary tree! It seems silly to me to save it every year, but every year I think about it. I'm sure you've seen this before, but I LOVE to do it!
We just scoured HB's alleyways for someone that had just trimmed their trees. It was really easy to find. Grabbed a bottle of black spray paint from the garage and went to town painting the stick black. I tied a halloween ribbon around them this year, and stuck them in my jar with my Pottery Barn-inspired chalkboard rocks...Put some $1 store crows in the branches...and voila!
Quick, make one, there's totally still time!

Monday, October 4, 2010

Halloween Projects

I haven't posted in forever!
I have been BUSY, but I don't have much to show for it. Headbands and boutiques, a little teeny side job, FHE kits, a quilt that's been begging to be done, and other random projects have been taking up the limited amount of time that I have to do projects. (nap time, and bed time)
Anyways, I whipped these to suckers out during nap time today...
exhibit one...
last year, I spray painted my ugly red berry wreath that I've had forever ( I don't prefer wreaths that are not super full) Anyway, I made it my scary wreath for Halloween...but still the unfullness of it still bugged. So when I saw this tut, I thought I could enhance my scary wreath with my flavorite halloween candy!

ps, she used a 16" wreath form, but I used a 12" so that it would fit inside my black scary wreath. Crow is from the dollar store!
exhibit 2:
easy candy corn craft...can't say much about it, but I thought it looked fun and easy, so here it is:

Tuesday, July 27, 2010

sandy toes and popsicles headband giveaway!

Hey guys!
One of my favorite blogs to find fun things to do with my kids asked me to do a giveaway!
She's giving away 2 custom headbands--
Go check out her awesome site to get the skinny!

Wednesday, July 21, 2010

Mustache Shower

I just posted the pictures from the mustache shower i made the afore-mentioned banner for.
Here's a sneaky-peek, but if you want all the details, go visit my other blog!


Saturday, July 17, 2010

oh boy banner

a friend and I threw a mustache baby shower for 3 of our friends that are having boys! (hence the mustaches and the "oh boy") it was so fun, and I'll post more pictures of that later...but I had to post the banner that I made! I thought it turned out soo cute. My friend Rachelle let me use her 12: cricut to do it, and it was soooo fun!

eat cake banner

I found this banner from some scrapbook store... I HAD to make it instead of a banner that said 'happy birthday'. So, my friend Rachelle came down from LA for a day to project.
I did add a couple small buttons for embellishment after this picture was taken, but here are our finished banners! Soo fun! I can't wait to hang mine up for Max's birthday week!

thanks for a fun day, Rachelle!

Monday, July 12, 2010

The Rooster Chest

I got this cute little rooster chest thingy from a friend that I knew when I was at BYU. It was in her parents garage, and they were going to throw it away...at the time, I really liked the old country/barn look, so I thought it was so cute, and I've carted it from BYU, to AZ (5 moves) to CA (2 moves) crazy. Anyways, it really hasn't gone with any of my stuff...especially the maroon color, so I finally decided to change it up. (why was I waiting? who knows). Jeff has adoringly called it 'the cock' and it's been a neat little place to store stuff. Just not so much my cup o' tea anymore.
And using all that free paint that I got from glidden, of course all the in the same "true turquoise" color, I did this back in February, shortly after I painted Ivy's dresser the same color. I put it up, and a got several compliments on it when people came over, but it actually made me want to puke. I didn't enjoy the black in it. bleh! I actually didn't post about it back then because I just wasn't satisfied with it yet.
So, I thought I'd try to cover up the black with the same color...
and here she stands today. I forgot the little turny thing that you open it with...and I'm not so certain that I still like the black and white damask in it, I'll probably change it when I find something perfect, but for now , it's waaaay better than it was previously, times 2!
sigh, turquoise!

Sunday, July 11, 2010

You're Expected Sign

Every time I go to my friend's house for a baby shower, or a birthday party or a Halloween party, she'd have a hand-written note on the door that said: "please come in, you are expected." I've always thought it was an awesome way to let people know that they don't have to knock, and to just come on in. She's so classy (actually two of my friends do this, but they're sister-in-laws, and they're both classy!)
Anyways, so I totally copied them a few years ago for when I had Bunko at my house, or a presidency meeting, or a group of girls coming over for project night, or whatever! Back then I just made one with scrapbook paper and I just taped it up on the door every time.
But, the very friend that I stole the idea from came to visit me this week, and I thought it would be a perfect little project for us to do together, so I ordered some vinyl, and we made a more substantial version of what she always does. Here is our finished project! I was so excited to hang it on my door today for my presidency meeting!

I bought some 50 cent wood from Home Depot and had them cut it at 6" x 9"
we sanded the front down and painted it black.
After the paint dried, we cut a piece of paper to fit (5 1/2" x 8 1/2"), mod podged that on.
The we arranged our vinyl...you all know how to do that.
I sanded the dickens out of the edges, sealed it with a clear top coat, tied my token Zebra ribbon around it in a knot.
Lastly, I made a large loop with the zebra ribbon and staple-gunned it to the back a few times. All done! Do you love it?

Saturday, July 3, 2010

Baby Bands are Available!

I'm so excited to have these sweet little baby headbands ready to go! I'll be taking them around to stores next week, but thought I'd give my followers a heads-up first. If you're interested, let me know! So fun, right, especially on this darling baby!
How lucky am I to have a friend with the cutest little baby girl, who also happens to be an amazing photographer?!? I got an awesome model and an awesome photo shoot all at once! Thanks Michelle for being willing to help me! Check out Michelle's website for more information on her photography!


Wednesday, June 30, 2010

Liberty Bands

headbands to celebrate our independence!!
Happy Fourth of July!

Operation Curb-Appeal: king-size sham {tut}

I totally do not enjoy the curb appeal of my bedroom!
I think it's because it's sort of the catch-all, it's where my craft stuff is, and especially, no one sees it, so it's been the last place I think about to decorate. I have done several different things over the years, that I haven't LOVED, so here's an attempt to improve the curb appeal. I WILL NOT show any pictures of my bedroom in full until it's completed...then maybe I'll show a before picture. Then it will be OK to puke. But, part one is to dress up the bed with pillows...I don't know if there's a better way to do this, or if I did it right, but here's what I did...
To make 2 shams for king-size pillows,
Cut:
2-42 x 25 1/2
4- 27 x 25 1/2
{1 big rectangle, and two smaller ones will make 1 sham}
with Right Sides together, lay the big rectangle down, and then layer on top of it the two smaller rectangles so that they overlap each other.
You will hem the inside raw edge of each of the smaller rectangles (only the sides that overlap, as seen in the picture below...but yours should overlap more than this!)
I just folded it over twice about a 1/4 of an inch, and stitched it down.

Re-lay the pieces down, RST with the two hemmed pieces overlapping each other, and make sure that all of the edges line up...and PIN. Sew around the perimeter.
Snip the corners off and turn it inside out.
Iron down your seams so they're nice and crisp.
Next, pin your overlap down so that it remains straight, as seen below.


You're going to sew a rectangle around the perimeter again to create a little house for your pillow, as well as a border around the entire thing. So, after you've pinned the overlaps together, measure and draw a line, with disappearing ink 3 inches from the outside of each edge. see:
Then sew along your line...can you see my faint line? barely!
Stuff you're pillow inside through the overlapping flaps...this is what you're back should look like:
and here's the front.
Like I said...don't know if this is what you're supposed to do..maybe I should have put some interfacing in, or batting to make it stiffer...but do what you will!! hope that's helpful!
oh...lather, rinse, repeat for your hub's pillow!

Thursday, June 24, 2010

Skirt to Dress, autie style...

yeah, yeah, here's another one of those women's skirt to toddler dress refashions...but I hadn't done one yet, and this one was begging to be made:
She's moving so quick nowadays that I can't really get a good picture, but she was pretty, and she knew it!
It was the easiest thing ever! My MIL found this XL yummy peach-dessert women's skirt at Target on the clearance rack...and had to buy it, and I had to steal it from her, but she approved. And I grabbed one of Ivy's plain white tanks...
crossed myself before cutting the decadent skirt in half,
drew a line with erase-able marker just under the armpit
folded the end in a little bit to hide the raw edges
this is the underside, with contrasting thread, so you can see...I sewed a rectangle through 3 layers of elastic...one end, and one end folded under. get it? Then I just sewed the raw edges of the skirt up the middle to make a mini version of what the skirt looked like before.
pinned it to the tank top...
sewed a zig-zag
and there she blows...only it is obviously waaaay too long.
So, when nap time was over, I tried it on her so I knew how much to cut off the bottom.
I chopped it off...(the beauty of this fabric is that you don't have to hem it...)
i love it!